Showing posts with label Tips. Show all posts

Hiren's BootCD From USB Flash Drive (USB Pen Drive)

Step 1
Connect USB Pen Drive (1GB or more)
Step 2
Download and Run USB Disk Storage Format USBFormat.zip (34KB)


Các lệnh trong CMD


Command Prompt là một ứng dụng rất tiện lợi có sẵn trong windows để quản lý máy tính cá nhân và quản trị mạng thông qua các câu lệnh tương tự như Dos, tuy nhiên hệ thống câu lệnh này lại khá rườm rà.
Ngoài những câu lệnh căn bản như trong hệ điều hành MS DOS Command Prompt có một số câu lệnh mới. Sau đây là thống kê một số câu lệnh hữu ích thường được sủ dụng nhất.
Để khởi động Command Prompt trong Windows XP bạn tìm theo địa chỉ: Start–>Programs–>Accessories –> Command Prompt. Hoặc vào Strart –> Run (Windows + R) gõ cmd –> ok.
1. Lệnh Ping:
Phân tích sự kết nối đến một máy từ xa trên mạng. Lệnh này chỉ có hiệu lực khi máy bạn đã cài giao thức TCP/IP.
Cú pháp: ping ip/host [/t][/a][/l][/n]
- ip: địa chỉ IP của máy cần kiểm tra; host là tên của máy tính cần kiểm tra. Người ta có thể sử dụng địa chỉ IP hoặc tên của máy tính.
- Tham số /t: Sử dụng tham số này để máy tính liên tục “ping” đến máy tính đích, cho đến khi bạn bấm Ctrl + C
- Tham số /a: Nhận địa chỉ IP từ tên host
- Tham số /l : Xác định độ rộng của gói tin gửi đi kiểm tra. Một số hacker sử dụng tham số này để tấn công từ chối dịch vụ một máy tính (Ping of Death – một loại DoS), nhưng tôi nghĩ là hacker có công cụ riêng để ping một gói tin lớn như thế này, và phải có nhiều máy tính cùng ping một lượt.
- Tham số /n : Xác định số gói tin sẽ gửi đi. Ví dụ: ping 174.178.0.1/n 5
Công dụng : Sử dụng để kiểm tra xem một máy tính có kết nối với mạng không. Lệnh Ping sẽ gửi các gói tin từ máy tính bạn đang ngồi tới máy tính đích. Thông qua giá trị mà máy tính đích trả về đối với từng gói tin, bạn có thể xác định được tình trạng của đường truyền (chẳng hạn: gửi 4 gói tin nhưng chỉ nhận được 1 gói tin, chứng tỏ đường truyền rất chậm (xấu)). Hoặc cũng có thể xác định máy tính đó có kết nối hay không (Nếu không kết nối,kết quả là Unknow host)….

USB Booting with Grub4Dos

1) Connect a 256 MB or above flash drive.
2) Download and run USB Disk Storage Format (34 KB). Follow the steps in the first screenshot.
3) Download and run grub4dos.zip (187 KB). Follow the steps in the second screenshot
4) Copy grldr and menu.lst (from HBCD folder of the CD) to the usb drive.
5) Put Hiren's BootCD (9.7 or newer) into the CD Drive and copy everything from CD to USB Flash Drive. Now the contents of your USB Flash Drive should look like as in the third screenshot.

Want to Enable GodMode in Windows 7? Here's How!

Overview:
Do you know how to activate GodMode in Windows 7? 
Did you enable GodMode in Windows 7? In this tutorial we will talk about GodMode in Windows 7. 
-  Firstly we are going to tell you what is GodMode in Windows 7. 
- Secondly we will give you a method of activating GodMode in Windows 7. 
The steps are so simple that you can master them soon. Just read this article and then try to enable your GodMode in Windows 7.


Install All New Pidgin 2.7 in Ubuntu Lucid, Karmic

Have you guys already forgot Pidgin. I hope not. For starters Pidgin used to be the default IM client in Ubuntu up until Ubuntu Karmic was released. Then it was replaced by Empathy as you must have already noticed. Pidgin 2.7 was recently released with a number of improvements and bug fixes. Let's see how to install Pidgin 2.7 in Ubuntu Lucid and Ubuntu Karmic.

What Are The Changes?
  • GtkStatusIcon for the docklet, providing better integration in notification area.
  • Added UI for sending attentions (buzz, nudge) on supporting protocols.
  • Made the search dialog unobtrusive in the conversation window.
  • Added a menu set mood globally for all mood-supporting accounts.
  • Show file transfer thumbnails for images on supporting protocols.
  • Full Changelog here.

How To Stop Windows 7 From Automatically Downloading Driver Software And Icons For Your Hardware Devices

By default Windows 7 will automatically download and install drivers for your PC. This is recommended to keep all your hardware to work properly. Windows 7 obtains all it’s driver updates from Windows Update website. But not all driver updates go smoothly. Sometimes drivers lose compatibility with other drivers in your PC and due to this your PC may become inoperable.
So if you decided not to make Windows 7 automatically download and install hardware updates, and would rather update drivers yourselves by directly downloading from Manufacturer of hardware, then go ahead and follow these steps:
1. Click “Start” –> right-click on “My Computer” and then select “Properties”.
2. In the left pane of System Properties window, click on “Advanced System Properties”.
advanced system properties

ubuntu compiz-fusion dual-screen

Ubuntu 10.04: The Easiest Way To Move The Window Buttons To The Right [Newbie]

We covered lots of ways to move the Metacity window controls (buttons) back to the right in Ubuntu 10.04 Lucid Lynx: from Gconf Editor to gconf via command line, Ubuntu Tweak or the MWButtons script. But all these may seem complicated for a complete noob and for this reason I decided to write this post.


Most new Ubuntu users have no idea how to use a terminal (and are scared by it), Ubuntu Tweak may seem to advanced and so on. But MWButtons now has a PPA and thus you can simply download a .deb file.


So, the easiest way to move the window buttons to the right (or any other order) in Ubuntu 10.04 is to download THIS file , then double click it and install it. Once installed, in the menu go to Applications > Accessories > Metacity Window Buttons and change the button layout to whatever you want:

mwbuttons

www.webupd8.org

How to boot from a USB device .

Today i will make usb boot device by Virtual Floppy Drive and HP USB Disk Storage Tool
You can download them in here .
  1.  Create Virtual Floppy Drive
After download finished and then extracted them you have folder like here
 
- Run vfdwin.exe  in folder Virtual Floppy Drive .


- Click Install


- Choose tab Driver 0 , change Drive letter  and click
Open/Create then click Format


if successfully you will have list file in drive A . Example


2. Format USB with HP USB Disk Storage Tool


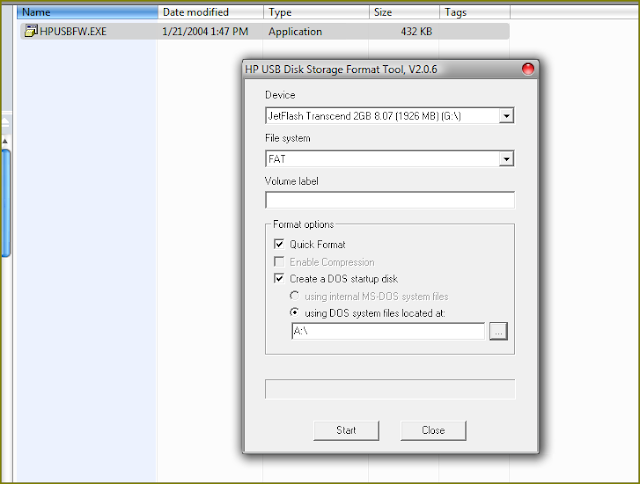
- Run HPUSBFW.EXE , chosen  as in picture and click Start


- After format you copy all file in folder Boot to your usb device .Now , 
You can use it ...

Good luck